Table of Contents
Introduction to Print-on-Demand Business with Blinkstore
Entrepreneurship has moved beyond traditional brick-and-mortar stores in today’s dynamic economic scene. The print-on-demand (POD) business model is one new method that has been proven and has significant support in the e-commerce world. As a result of the rise of platforms such as Blinkstore, budding entrepreneurs now have a tremendous tool to turn their creative ideas into businesses within minutes.
Print-on-demand streamlines the process of producing custom-designed items, enabling anyone to build their own distinct brand without the need for inventory, manufacturing facilities, logistics, and investing upfront money. Among the numerous POD platforms, Blinkstore stands out as a user-friendly, simple, and complete solution for people who want to start a print-on-demand business.
This blogs is a step-by-step guide on how to start a print-on-demand business with Blinkstore.
It covers the steps required to turn your idea into a reality, from setting up an online storefront to designing and selling products to earning profits with your business. Excited? Let’s begin!
How to create a store on Blinkstore?
Creating a your store using Blinkstore allows you to showcase and sell your custom-designed products easily on a professional looking e-commerce store. Set up your store by following these step-by-step instructions:
1. Visit the Blinkstore website
To begin, launch your web browser and navigate to the Blinkstore website.
2. Sign Up or Log In
If you don’t have an account already, click the “Sign Up” or “Create an Account” button to create one. You must enter your email address and create a password. Log in with your existing credentials if you already have one.
3. Create new store
Once you’ve logged in, you’ll be sent to your Blinkstore dashboard. From here, you can create your first store. Click on the “Create +” button in the top left corner and select “New Store”. Write the name of your store when prompted. Make sure to select a name that you want for your sub-domain.
For example: Your store’s name is Hustle Hard then the URL for the store will be hustle-hard.blinkstore.in, you can later link your own custom domain (website) from the settings. If you plan on using Blinkstore’s default URL, then the name you write to your store will appear as shown in this example.
How to customize your Store on Blinkstore?
Now that your store is created, let’s jump to customizing your store. Customising your store allows you to establish a distinct and visually appealing online presence that is consistent with your brand identity. Here’s how you may change the look and settings of your store:
1. Go To “Edit Store”
Once you are logged in and see the store you want to customize, click on Edit Store. On the left menu you’ll see options to customize store, customize banner, about store, social media, settings etc.
2. Choose a Theme
Depending on the brand, you can select a theme colors for your store. Themes define your storefront’s overall layout, colours, fonts, and visual style. Choose a theme that fits your brand.
3. Upload Logo and Banner
Customise the logo and banner of your store by uploading your logo and a banner image. The banner (Cover Image) should be atleast 1200 X 400px. And upload a high resolution transparent logo for best results. You can also upload a transparent 1:1 Favicon to go that extra mile on little customisations. We recommend sellers to play around with the customisation options and discover what looks great for your brand.
4. Colour Scheme and Fonts
Change the colour scheme and fonts used throughout your store. Colour and font consistency contributes to a professional and coherent appearance. Select colours that complement your brand’s identity and fonts that are easy to read.
5. Pro-Tip: Use Custom Product Mockups
The overall look of the eCommerce brand depends on the product mockups you use. Blinkstore allows your to upload custom designed mockups. You can try out Mockey.ai, a free AI powered Mockup Generator or you can design them using design tools of your choice. There are many paid mockup generators available on the Internet with millions of options to choose from.
6. Preview and Publish
Before publishing your changes, use the preview option to see how your changes will look to the visitors. Once you’re happy with the look, click the “Publish” or “Save” button to make your changes live.
Remember that a well-customized store improves not only the visual appeal but also the user experience. By integrating the aesthetic of your store with your brand and responding to the tastes of your target audience, you can lay a solid foundation for success in your print-on-demand business on Blinkstore.
How to design and add products on Blinkstore?
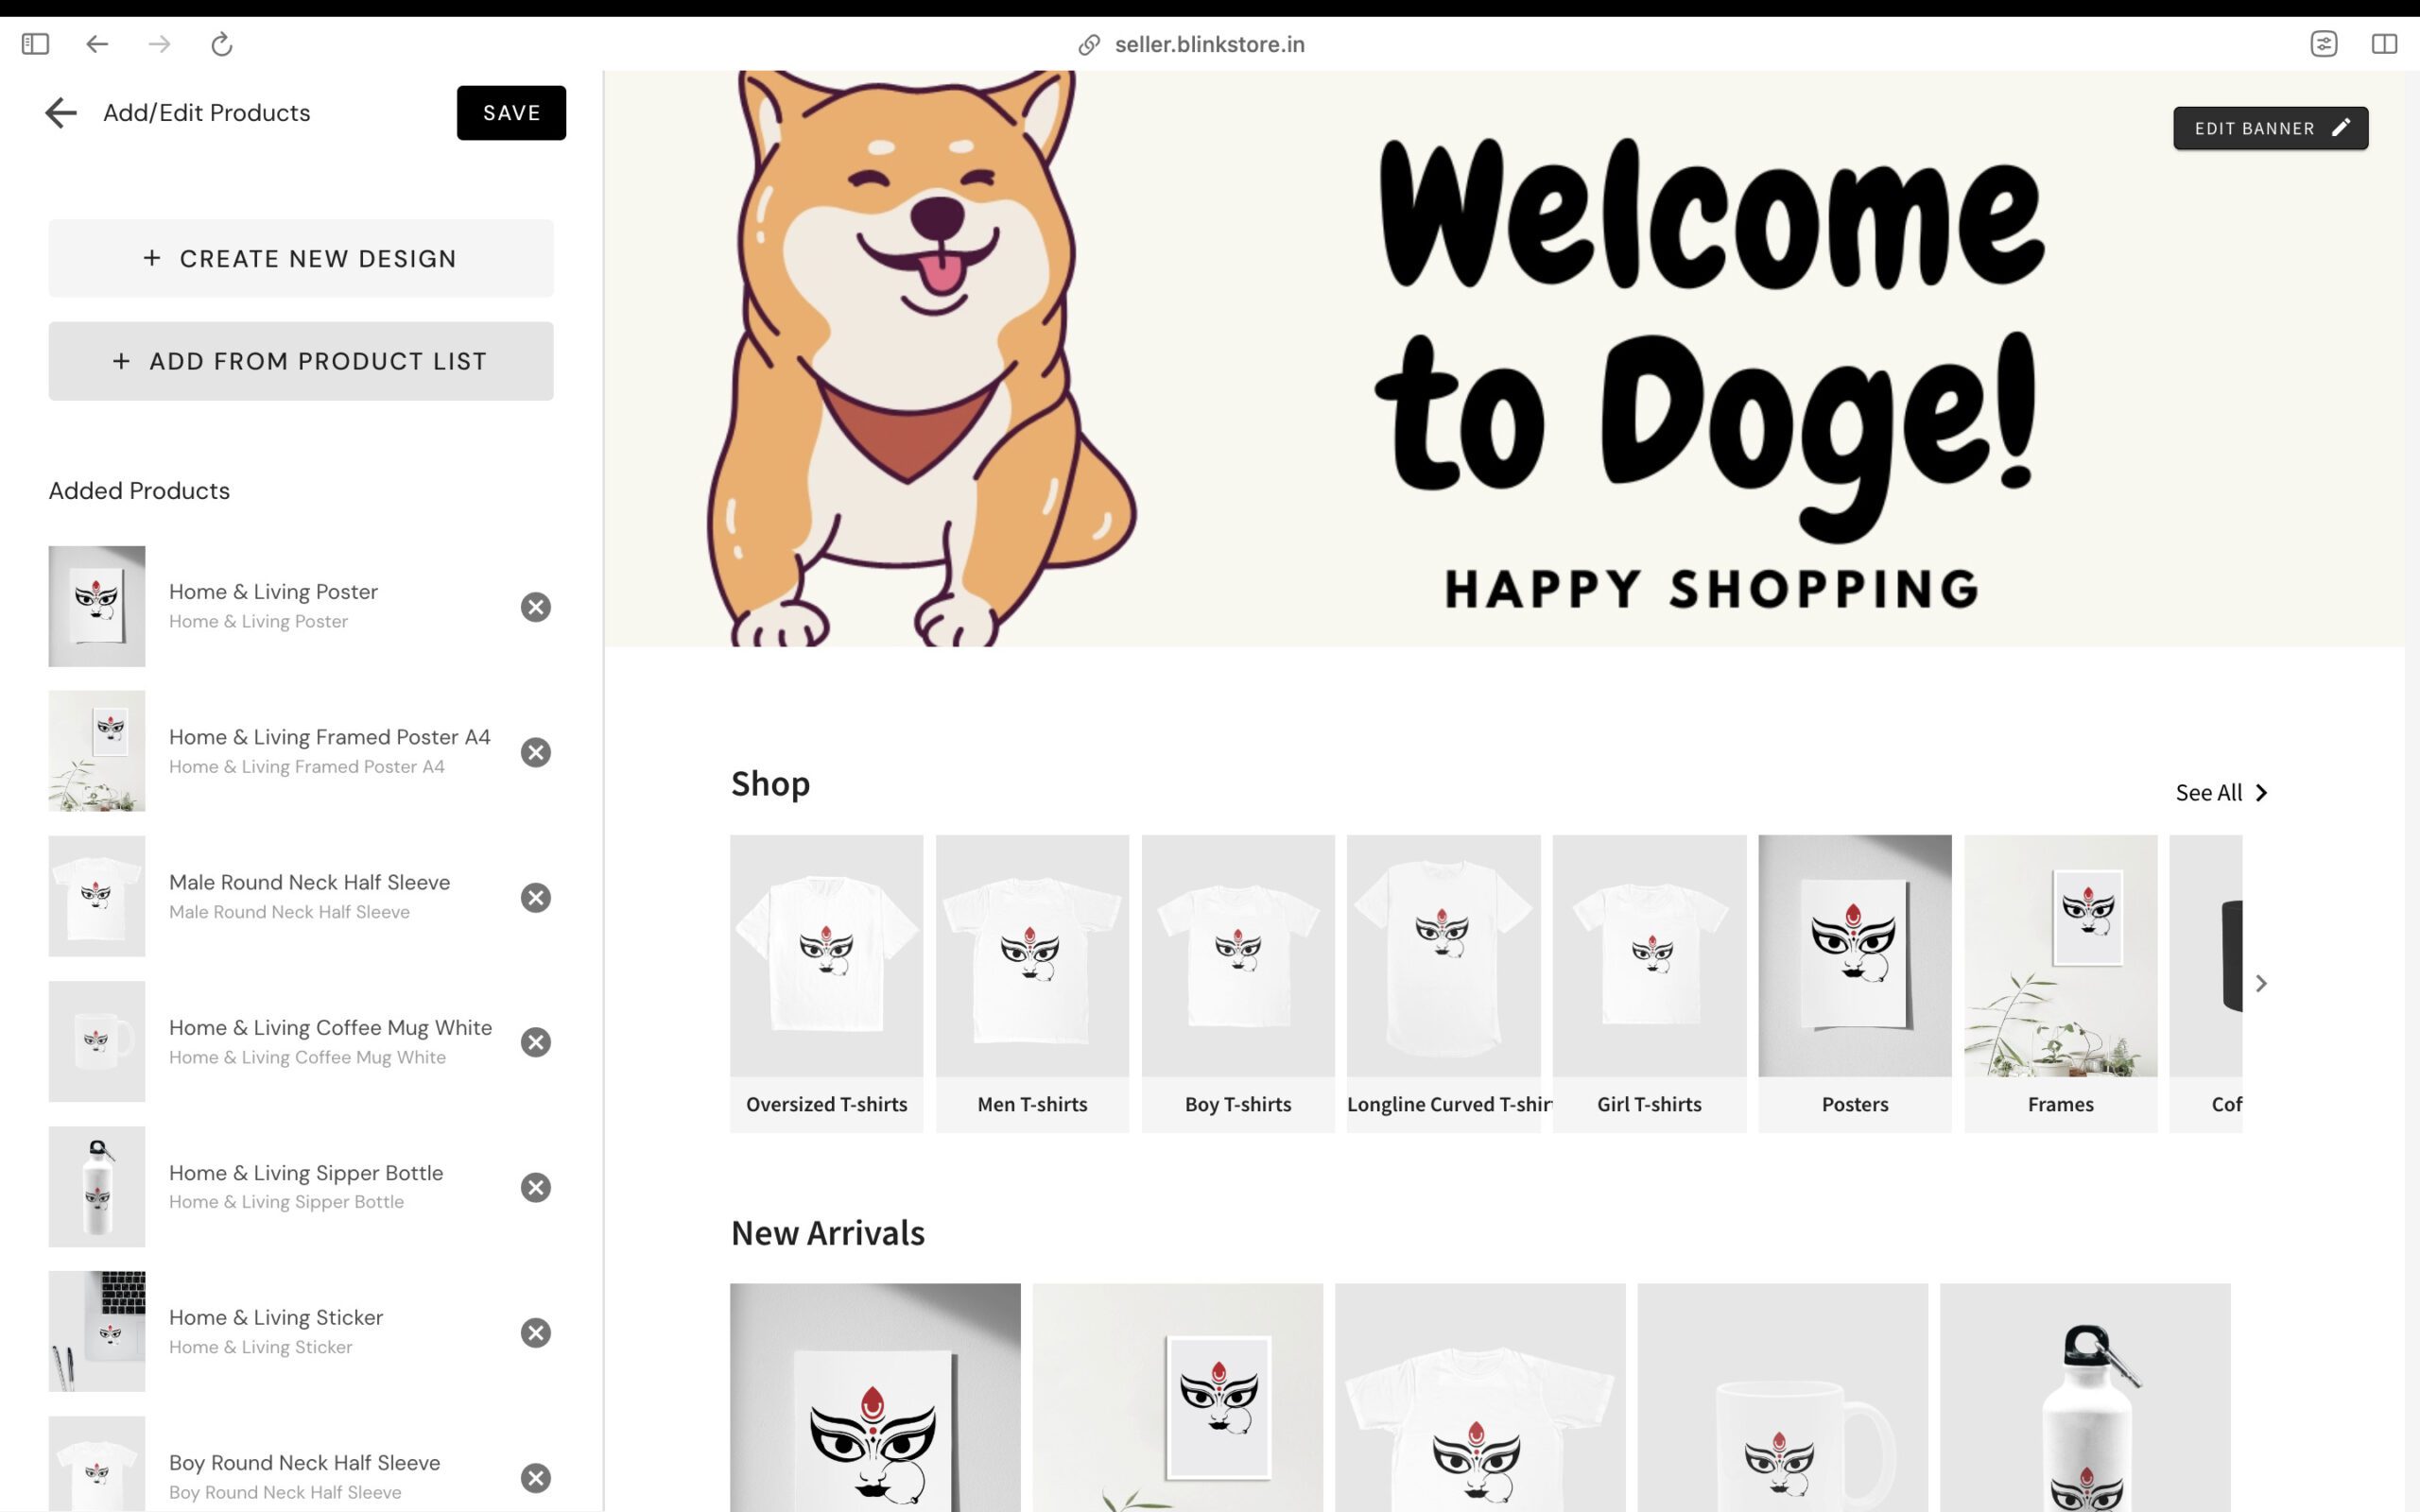
This is the third step of how to start a print-on-demand business with Blinkstore. Here are the procedures for designing and adding products to Blinkstore:
- Open the store on which you want to add products and click on “Add/Edit products” on the left navigation.
- Choose the products you want to sell from the list of catalog.
- Upload your design file and customize the products. You can drag and move, zoom-in or zoom-out your designs on the products to get desired look.
- Depending on which product you are customizing, you can upload designs that are printed all-over the product (Ex: Coasters, mobile covers, and wall poster) or on front and back. (ex: t-shirts).
- Enter the name, description, and your profit margin of the product.Determine your profit margin. This is the amount you wish to earn on each sale.
- Click on the “Publish” button to add that product on your store.
How to link a custom domain on your Blinkstore?
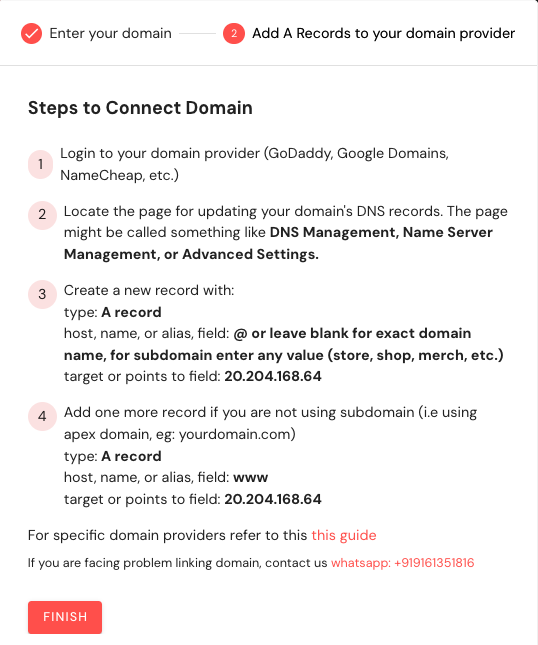
Above are the steps on how to link a custom domain to your Blinkstore:
- Click on the “Settings” tab in your dashboard and Click on the “Link Your Domain” button.
- Enter your custom domain name.
- Login to your domain provider (GoDaddy, Google Domains, NameCheap, etc.)
- Locate the page for updating your domain’s DNS records. The page might be called something like DNS Management, Name Server Management, or Advanced Settings.
- Create a new record with:
- type: A record
- Host, name, or alias, field: @ or leave blank for exact domain name, for subdomain enter any value (store, shop, merch, etc.) target or points to field: 20.204.168.64
- Add one more record if you are not using subdomain (i.e using apex domain, eg: yourdomain.com), type: A record, host, name, or alias, field: www, target or points to field: 20.204.168.64
- Click on the “Save” button.
The process may take a few minutes to go into effect. Once the verification is complete, your custom domain will be linked to your Blinkstore store.
How to integrate Google Analytics and Facebook Pixel on Blinkstore?
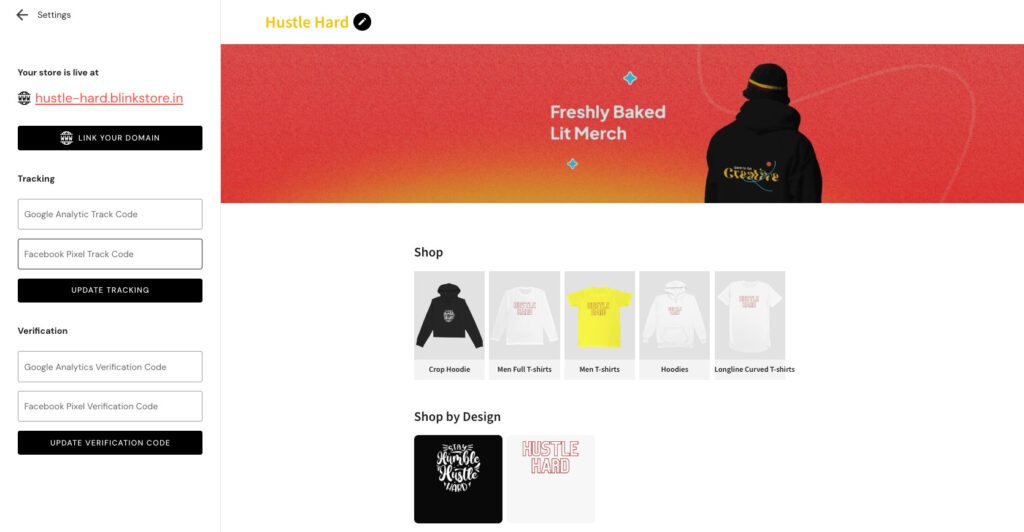
Integrating Google Analytics and Facebook Pixel into your Blinkstore is an important step towards tracking and analysing customer behaviour on your website. These analytics solutions provide information about the success of your store, consumer interactions, and marketing efficacy. Here’s how to connect Google Analytics with Facebook Pixel:
Google Analytics Integration
Sign in to Google Analytics: If you don’t already have a Google Analytics account, create one. Log in if you already have an account.
Create a New Property: Create a new property for your Blinkstore in your Google Analytics dashboard. This will generate a tracking ID for you to enter into your store.
Get Your Tracking ID: After creating the property, you’ll receive a tracking ID in the format “UA-XXXXXXXXX-X.” You’ll need this tracking ID for integration.
Store Configuration:
Look for “Settings” on your Edit Store page.
Google Analytics integration: Locate the field where you may enter your Google Analytics monitoring ID. In this field, paste the tracking ID you copied before.
Save modifications: Once you’ve added the tracking ID, save your modifications. Google Analytics has been added to your Blinkstore.
Verify Integration: To check that the integration is working, wait a few hours and then log back into your Google Analytics account to see if data from your Blinkstore is being recorded.
Adding the Facebook Pixel
Log in to Facebook Business Manager as follows:
Create a Facebook Business Manager account if you don’t already have one. Log in if you have an account.
Create or Discover Your Pixel:
Navigate to the “Pixels” section in Facebook Business Manager. Make a new pixel or utilise one that already exists.
Get Your Pixel ID: After creating or selecting a pixel, you’ll receive a pixel ID in the format “XXXXXXXXXXXXXXXX.” You will need this pixel ID for integration.
Integrate Facebook Pixel: On the Settings page inside store editor, enter your Facebook Pixel ID.
Save modifications: Once you’ve added the pixel ID, save your modifications. Facebook Pixel is now available in your Blinkstore.
To ensure the integration is successful, utilise Facebook’s Pixel Helper browser extension to see if your Blinkstore’s pixel is firing properly.
How to set your profit margin on products on Blinkstore?
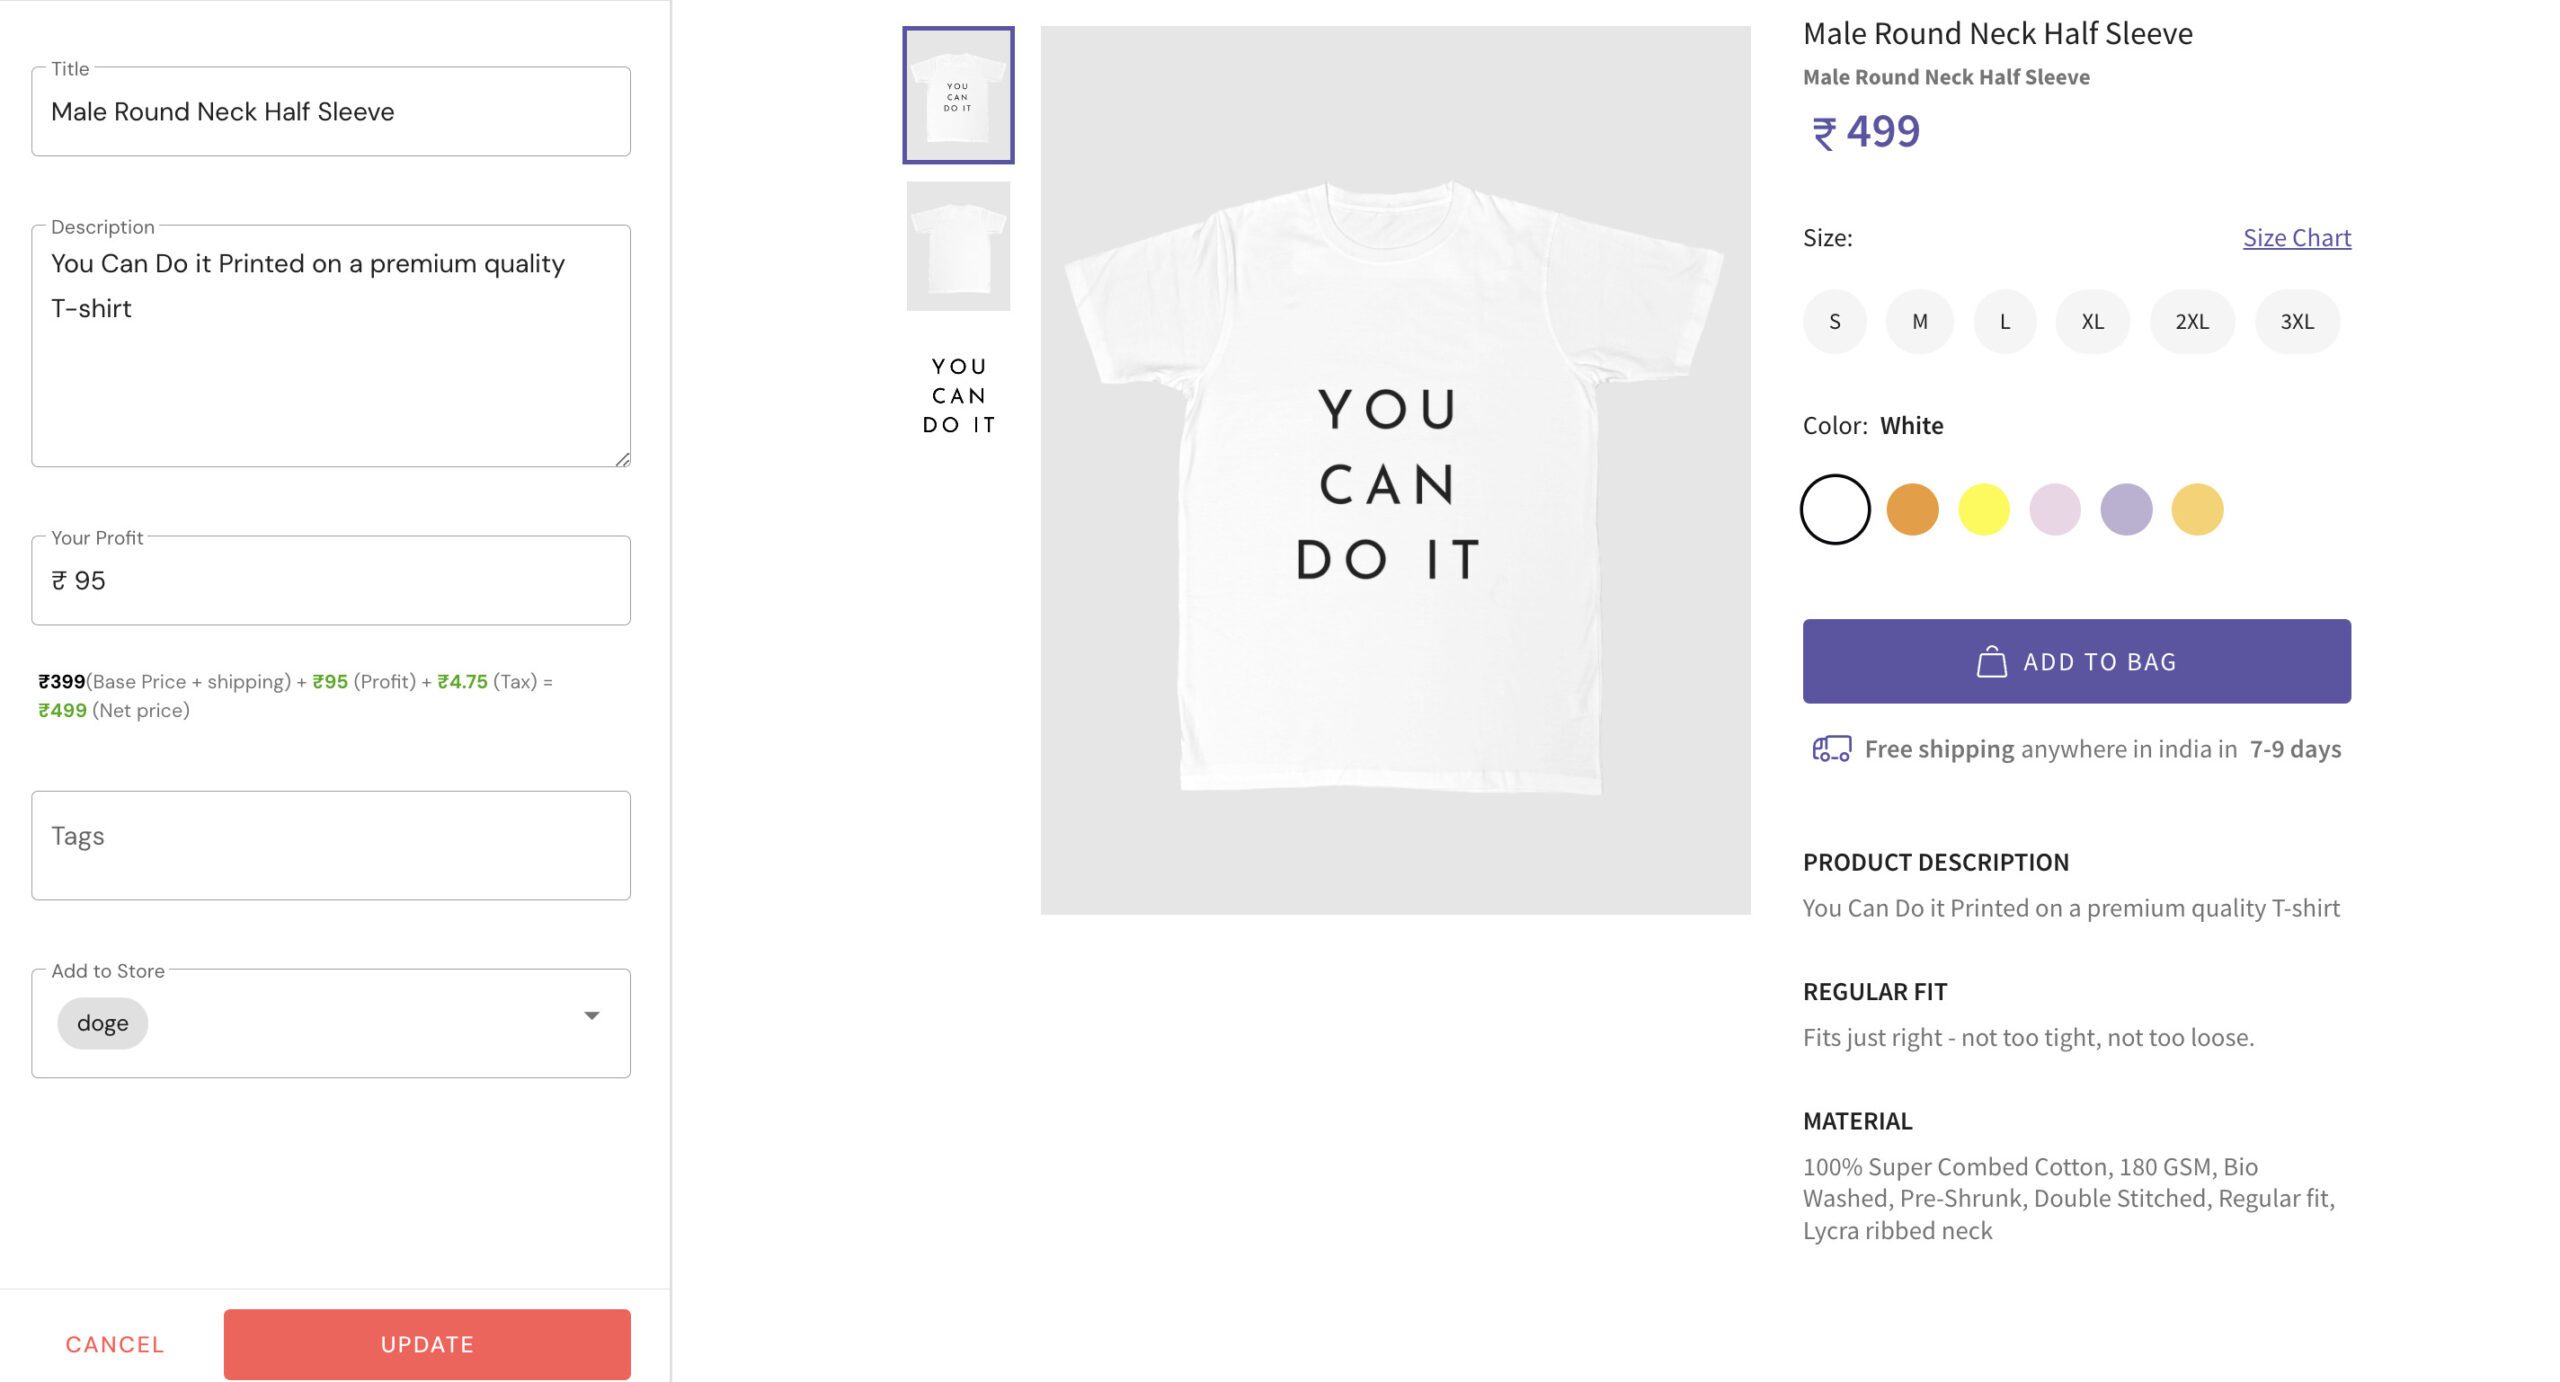
You can set the profit margin while creating and listing new products on your store. Or you can navigate to Products on your Blinkstore dashboard, find the product you want to edit, and go to Edit section.
To determine your profit margin on Blinkstore products, follow these steps:
- Select the product for which you wish to specify the profit margin.
- Scroll all the way down to the “Profit Margin” area.
- Enter the profit margin you wish to establish.
- Select the “Save” option.
- The product’s profit margin will be set and the selling price will be calculated automatically.
How to withdraw profits from Blinkstore?
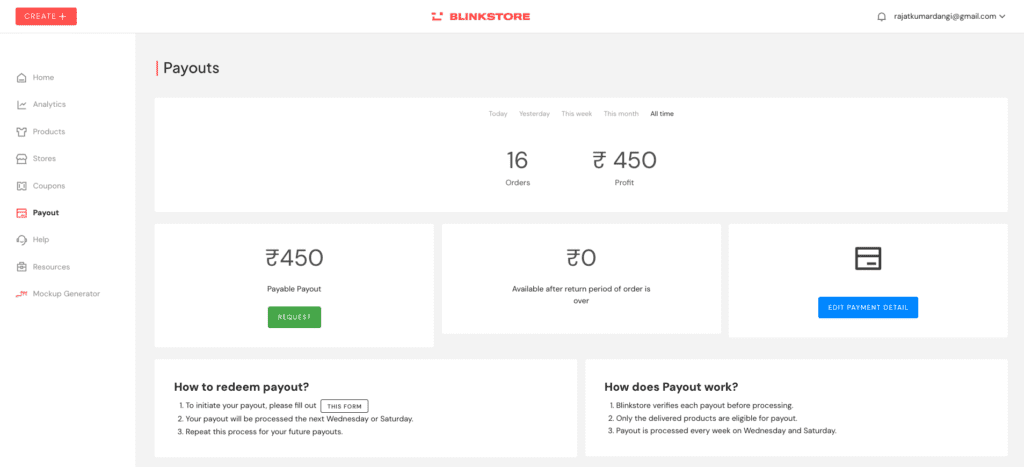
Finally, it’s time to withdraw some profits that you made with your products. Here are the steps for withdrawing profits from Blinkstore:
Sign in to your account on the Blinkstore website.
- In your dashboard, go to the “Payout” tab.
- Fill out the payout format and add all the payment details.
- Select the “Request” option.
- Enter the amount of money you’d like to withdraw.
- Choose a withdrawal method. Blinkstore accepts UPI and bank transfers for withdrawals.
- Select the “Withdraw” option.
What products can you customize and sell on Blinkstore?
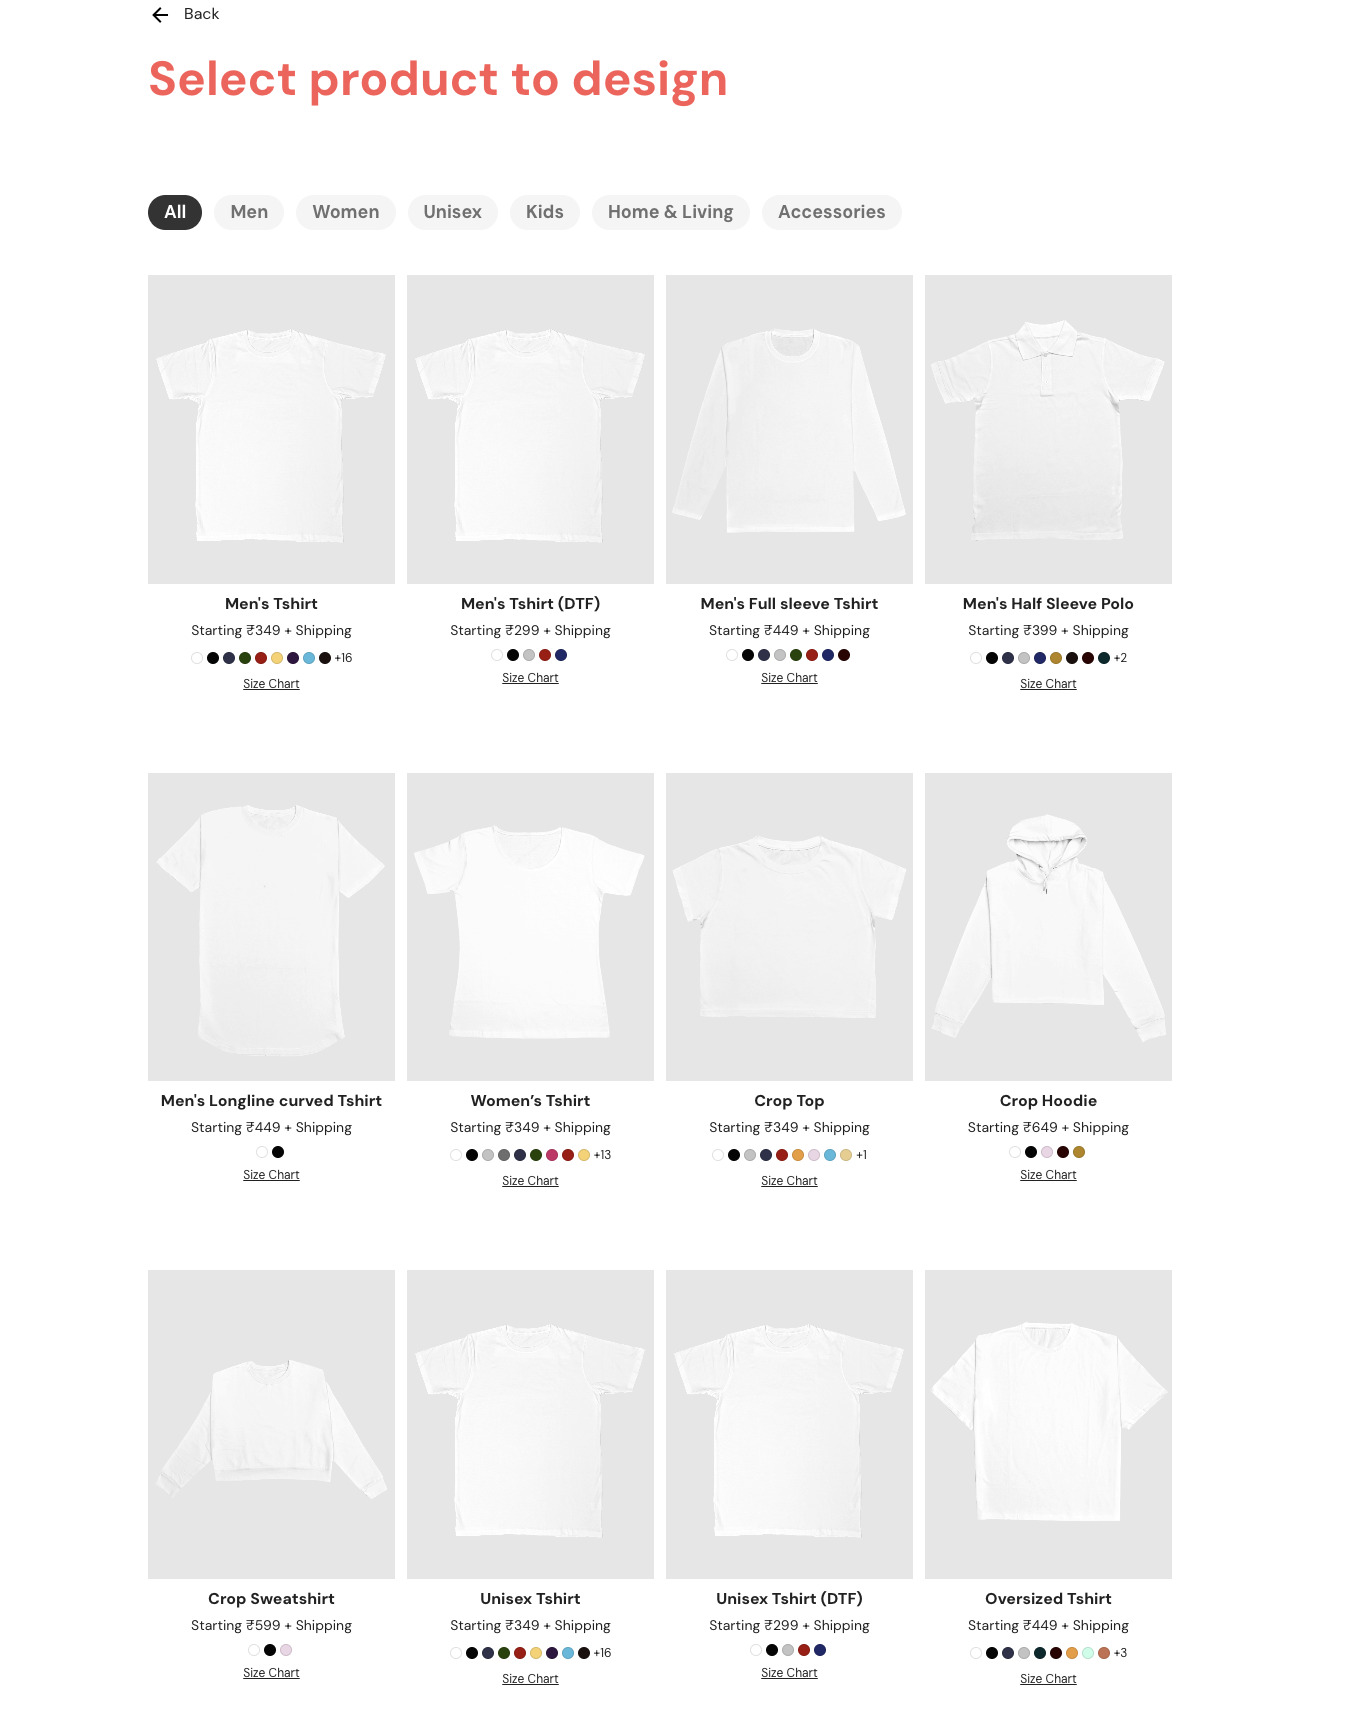
Blinkstore print-on-demand platform that allows you to customize and sell a variety of products, including t-shirts, hoodies, mugs, phone cases, posters, wall art, and custom product mockups. With over 50+ products to choose from, you can create unique and eye-catching products that your customers will love. You can refer to the product catalogue for the complete list.
How to create and upload custom product mockups on your Blinkstore?
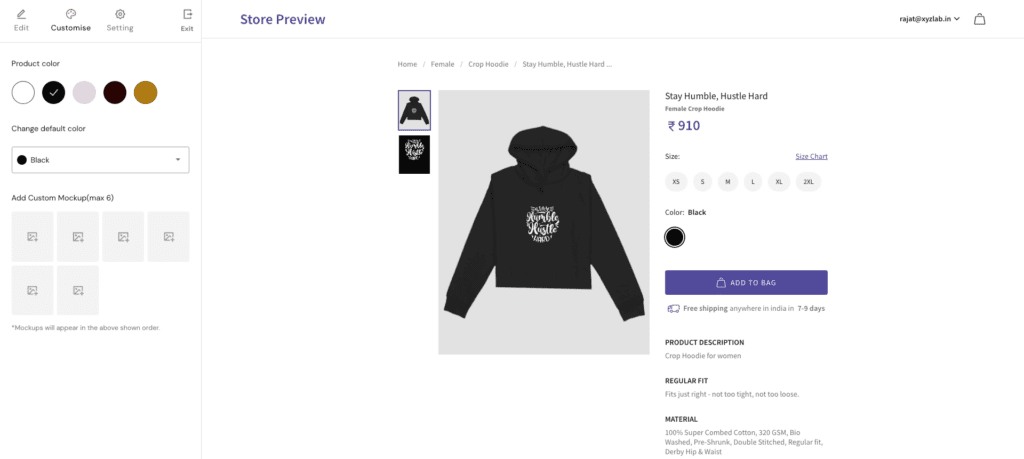
While you are editing a particular product, you can switch to “customize” on the top left, and see the option to upload upto 6 custom mockups. You can upload any kind of image here and it’ll show up on your product page.
We also recommend using Mockey.ai, an AI-powered mockup generator that generates the realistic and high quality mockups for free.
How to promote and sell your merch on Social Media on Blinkstore?
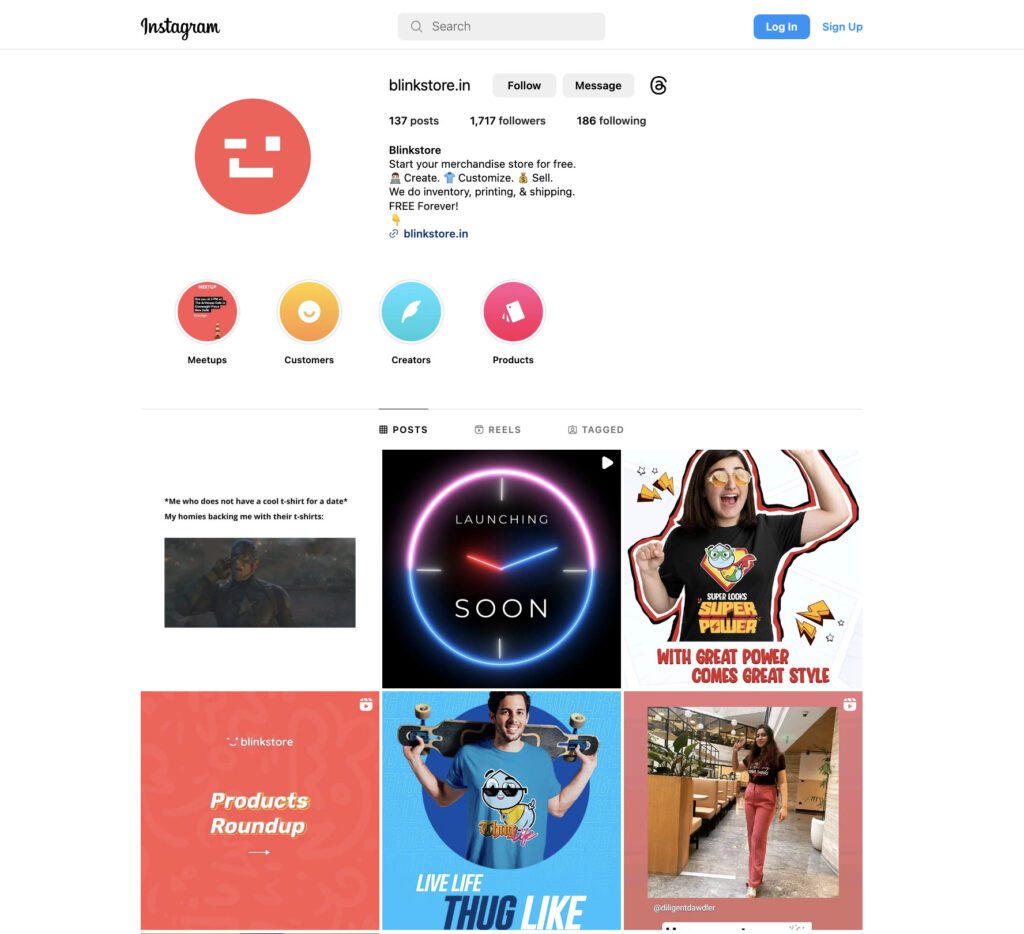
Social media is an excellent way for promoting and selling your merchandise and POD products. You may reach a larger audience and increase sales by generating eye-catching posts, using relevant hashtags, organising contests and giveaways, working with influencers, and running paid social media ads. It is critical to publish consistently and communicate with your followers in order to create relationships and urge them to purchase your merchandise. Be patient and continue to create outstanding material, and you will ultimately see benefits.
Here are some specific ways to promote your merchandise on social media:
- Make a giveaway in which individuals can win free merchandise if they follow your account and tag a friend. This is an excellent approach to increase interest in your merchandise and gain new followers.
- Collaborate with an influencer who has a following in your target market. The influencer can promote your merchandise to their followers, allowing you to reach a larger audience.
- Target people who are interested in the things you sell with sponsored social media adverts. This is an excellent technique to increase the reach of your postings and attract more attention to your merchandise.
Conclusion
Blinkstore is a simple yet powerful platform that enables you to seamlessly launch your creative ideas and business idea into a functioning e-commerce brand. Blinkstore, with the power of print-on-demand at its foundation, transforms the way businesses approach manufacturing and distribution. You may turn your designs into a thriving print-on-demand business that flourishes in the digital environment by leveraging the possibilities of Blinkstore and trying out new and creative marketing tactics.
FAQs
What is a print-on-demand business?
A print-on-demand (POD) business model is one in which things are manufactured only after a consumer placed an order. This eliminates the need for initial inventory and storage expenditures, allowing entrepreneurs to focus on developing custom-designed items that appeal to their target audience.
Why should I use Blinkstore for my print-on-demand business?
Blinkstore is an easy-to-use platform for entrepreneurs to manufacture and sell customised products without the hassle of inventory management. Its flexible features, integration possibilities, and customer support make it an excellent choice for starting a POD business.
What kinds of products can I personalise and sell using Blinkstore?
Blinkstore allows you to customise and sell a variety of products, including clothes (t-shirts, hoodies), accessories (hats, bags), home decor (posters, pillows), tech accessories (phone cases), and more. Product offerings may differ depending on the platform’s agreements.
How can I make my own product mockups?
Use graphic design software such as Adobe Photoshop or Canva to create bespoke product mockups. Source or build high-quality mockup templates that precisely portray the merchandise. Replace the placeholder pictures with your designs, tweak the sizes, and save the mockup files in PNG or PSD format.
