
To create a print on demand design, pick the product first, narrow your audience, choose one design type, build the file at 300 DPI in the product’s print area, then test it with a sample before you scale. The design work is the easy part now. Getting the file right is what separates a design that sells from one that prints badly.
You do not need to be a designer, and you do not need paid software. What you do need is a sequence, because doing these steps in the wrong order is the most common way people waste a week on artwork that cannot be printed on the product they had in mind.
This guide covers the full process: the five steps, the exact file specs for each product, where to get designs if you would rather not make them, which tool to use at which stage, and how to fix the problems that AI-generated artwork brings with it.
How to create print on demand designs in 5 steps
Most guides run this sequence backwards, starting with the artwork and dealing with the product later. That is how you end up with a design that cannot be printed on the thing you wanted to sell.
Step 1: Pick the product first, not the design
The product decides the print area, the printing method and the file size you need. A design built for a 12 by 16 inch t-shirt front will not drop onto an 8 by 3.5 inch mug wrap, and a gradient that prints beautifully on DTG becomes expensive on screen printing. Choose the product, note its print area, then design into that box.
Step 2: Narrow the audience until it feels uncomfortably specific
“Gym t-shirts” is a category, not an audience. “People who deadlift and hate cardio” is an audience. The narrower it gets, the less the design has to be beautiful to sell, because recognition does the work instead of aesthetics.
Step 3: Decide the design type before you open any tool
There are really only three, and each behaves differently at the press. Typographic prints reliably in every method and reads at thumbnail size. Line art works on light and dark garments and survives every print method. Photographic or full-colour looks the best and is the fussiest — it needs DTG or DTF, the highest resolution, and the most careful colour handling. Pick one before you start, because the choice changes the tool you should use.
Step 4: Build the file to the print spec
Canvas at the finished print size, 300 DPI, transparent background for garments, colours that survive CMYK. The exact numbers for every product are in the next section, and this is the step that separates a design that prints from one that only looks good on screen.
Step 5: Validate cheaply before you scale
Put the design on a mockup, list it, and order one sample. On a platform with no minimum order and no listing fee, testing ten designs costs you nothing but time, and the market answers faster than any amount of research will. Blinkstore’s own flow is built around this: create the store, add the design to any of 50+ products, set your profit, and nothing is printed until somebody buys. Dispatch runs within 48 hours once an order lands.
Only step 4 is technical. The other four are decisions, and getting them wrong is what wastes the design work.
The file specs your design has to hit
Screens are forgiving. Presses are not. A design has to be built at the size it will be printed, at roughly 300 DPI, or the edges go soft and the detail smears.
| Product | Typical print area | Pixels at 300 DPI |
|---|---|---|
| T-shirt front | 12 × 16 in | 3600 × 4800 |
| T-shirt pocket print | 4 × 4 in | 1200 × 1200 |
| Hoodie front | 12 × 14 in | 3600 × 4200 |
| Tote bag | 10 × 12 in | 3000 × 3600 |
| Mug wrap | 8 × 3.5 in | 2400 × 1050 |
| Poster (12 × 18) | 12 × 18 in | 3600 × 5400 |
| Phone case | 3 × 6 in | 900 × 1800 |
Three more file rules that cause most rejected uploads:
- Transparent PNG for garments. A white background prints as a white box on a black shirt. Export with the background removed, and check the edges for a pale halo where the cutout was sloppy.
- But never a transparent PNG for a marketplace listing image. Etsy does not support transparency and renders it as solid black. Flatten those to JPG. The design file and the listing image have opposite requirements, which trips up almost everyone once.
- Design in RGB, expect CMYK. Presses print CMYK, and the brightest screen colours — neon green, electric blue, hot pink — have no CMYK equivalent. They come out duller than your monitor promised. If a colour matters, pick one that sits inside CMYK rather than fighting it.
The printing method changes what the design can be
Nobody mentions this and it decides half your design choices. The same artwork behaves differently depending on how it reaches the fabric.
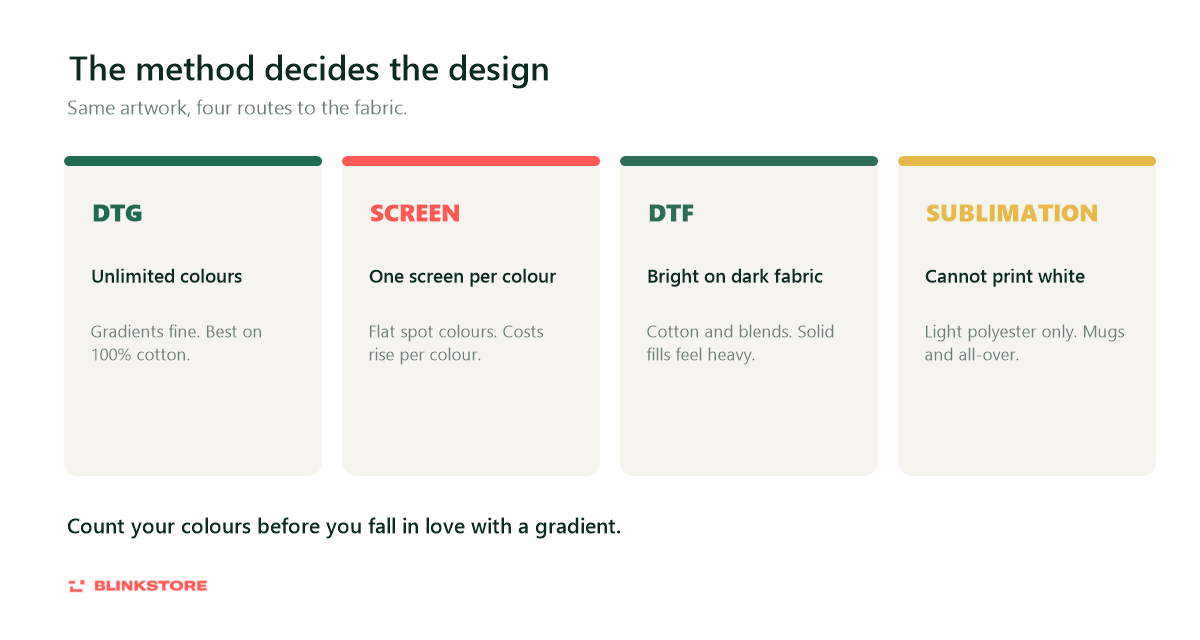
| Method | Good for | What it means for your design |
|---|---|---|
| DTG (direct to garment) | Full-colour and photographic artwork, single units | Unlimited colours and gradients are fine. Works best on 100% cotton. Very fine lines can fill in. |
| Screen printing | Bulk runs, bold graphics | One screen per colour, so every extra colour costs money. Design in flat spot colours, not gradients. |
| DTF (direct to film) | Cotton and poly blends, bright colours on dark fabric | Holds colour well on dark garments. Large solid fills can feel heavy on the fabric. |
| Sublimation | All-over prints, mugs, polyester | Only works on light polyester and coated items. Cannot print white. Perfect for cup printing design and all-over patterns. |
Two practical consequences. If you are designing for screen printing, count your colours before you get attached to a gradient. And if you are designing for sublimation, remember that white is not an ink — anything white in your file becomes the colour of the blank underneath it.
Where to get designs if you are not making them yourself
Designing is one route. There are three others, and each has a catch that is rarely printed next to the price.
| Source | Roughly what it costs | The catch |
|---|---|---|
| Design bundles (Etsy, Creative Fabrica, Amazon) | ₹100 to ₹900 for hundreds or thousands of files | Sold to everyone. The same “900K design” bundle is on thousands of stores already. Check whether the licence is genuinely commercial, and read what PLR or MRR actually permits. |
| Free vector and graphic sites | Free | Attribution is often required, and many licences exclude print-on-merchandise use specifically. Read the licence for the individual file, not the site’s homepage. |
| Hiring a designer (Fiverr, Upwork, local) | ₹500 to ₹5,000 per design | Get the copyright assigned in writing. A commission is not automatically a transfer of rights, and “I paid for it” is not the same as owning it. |
| AI generation | Free to a few thousand rupees a month | Your plan’s commercial terms decide whether you can sell the output at all. Covered further down. |
The honest summary on bundles: they are fine for learning what sells and terrible as a business. If a design is available to everybody for a hundred rupees, the only lever you have left is price, and that is a race you will lose to somebody with lower costs.
The best use of a bought design is as a starting point you then change enough to make yours — different type, different colourway, a reference only your audience understands.
Tools, organised by the job they actually do
Every other guide gives you the same list of five design apps. That list is not wrong, it is just not the useful shape. A print-ready file passes through five separate jobs, and the app that is best at one of them is usually bad at another. Here is the pipeline, with the failure each stage prevents.
| Stage | What it fixes | What to use |
|---|---|---|
| 1. Generate or draw | The blank page | Midjourney, ChatGPT image generation, Stable Diffusion or Adobe Firefly for generated artwork. Illustrator, Affinity Designer or Inkscape if you are drawing vector. Canva or Kittl if you want templates rather than a blank canvas. |
| 2. Upscale | The soft print, the single most common failure | Your generator’s own upscaler first, then a dedicated AI upscaler if you are still short of the pixel count in the table above. Never enlarge in a raster editor without one; that just interpolates blur. |
| 3. Cut out and clean the edge | The halo outline on dark garments | Photoshop, Photopea (free, runs in a browser) or GIMP (free). Zoom to 400% along the edge before you accept it. |
| 4. Set the type | Misspelled and warped AI lettering | Any vector tool: Illustrator, Affinity, Inkscape, or Canva for something simple. Set the text yourself and convert it to outlines before export. |
| 5. Proof | Colours that shift and artefacts you did not see | View at 100%, soft-proof to CMYK in Photoshop or Affinity, and check the design against both a white and a black background. |
- Stage 2 is the one everybody skips, and it is the reason most AI-designed shirts come back looking soft. No design app will warn you about it, because as far as the app is concerned the file is fine.
- You do not need paid software. Photopea and GIMP cover stages 3 and 5, Inkscape covers stage 4, and Canva covers stage 1 for template-led work. The free stack is genuinely sufficient; what it will not do is upscale, which is the one place worth spending.
Fixing the problems AI artwork brings
Generating artwork is now the fastest part of the job, which has quietly moved the bottleneck to the file. The failures are consistent and all of them are fixable.
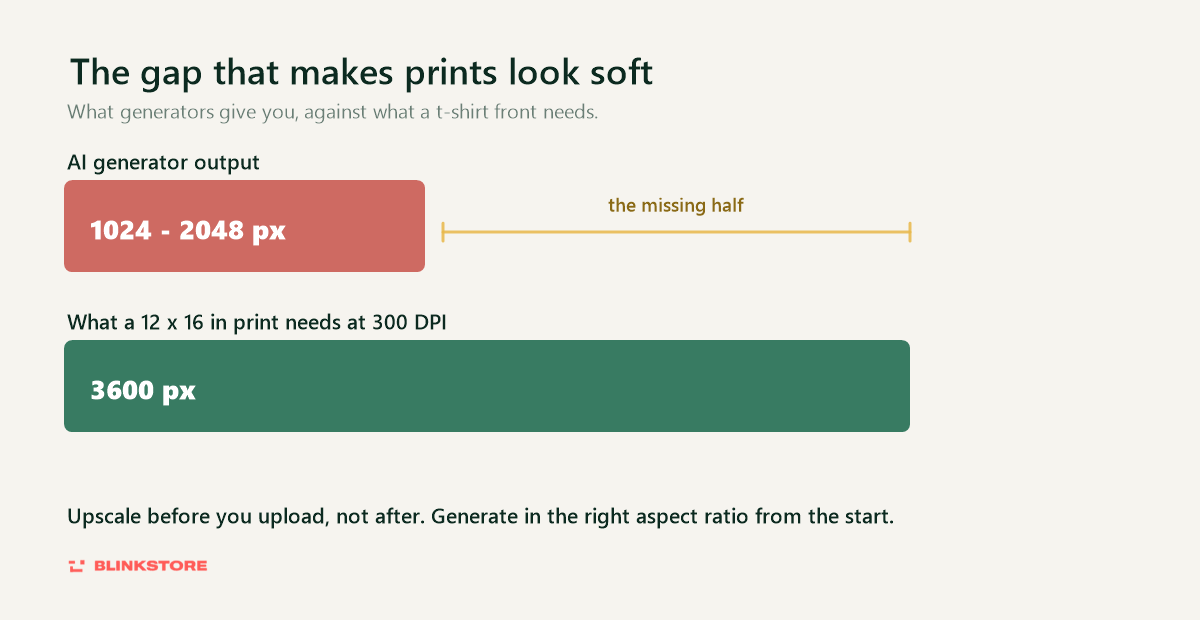
- Resolution. Most generators output between 1024 and 2048 pixels on the long edge, against the 3600 × 4800 a t-shirt front needs. Upscale before you upload, and generate in the right aspect ratio from the start so you are not cropping away pixels you needed.
- No clean transparency. Generators produce a background whether you wanted one or not, and removing it leaves a halo of background-coloured pixels that shows as a faint outline on a dark shirt. Zoom to 400% and check the edge.
- Text. AI-generated lettering is still unreliable and prints every flaw at full size. Generate the artwork, then set the type yourself.
- Artefacts you cannot see on a screen. Smudged fingers, warped patterns and mushy detail are invisible at thumbnail size and obvious at A3. View at 100% before you commit.
- Colours outside CMYK. Generators love exactly the electric colours that presses cannot reproduce.
The workflow that avoids all five: generate, upscale, clean the edges, set the type manually, soft-proof the colour, then order one sample before you list it.
What you are allowed to sell
This is the part that gets shops suspended, and almost no design guide covers it.
Your AI tool’s commercial licence
Every generator sets its own terms. Midjourney allows commercial use on paid plans but not on the free tier, and requires the Pro or Mega plan once a company passes one million US dollars in annual gross revenue. OpenAI assigns output ownership to you but leaves you responsible for the content. Stable Diffusion runs under an open licence that varies by model and interface. Adobe Firefly is trained on licensed content, which makes it the most conservative choice. Read your own plan before you build a catalogue on it.
Copyright in India
Section 2(d)(vi) of the Copyright Act, 1957 defines the author of a computer-generated work as “the person who causes the work to be created”. In September 2026 the Copyright Office held that an AI system is not a natural or juristic person and so cannot be named as an author. File as the sole human author, never list the tool, and keep your prompts and edits as evidence of your own creative input.
Trademarks are the faster way to get banned
Owning the copyright in your design does not give you permission to use someone else’s brand. Generators will happily produce logos, character likenesses and slogans that belong to other people, and marketplaces act on trademark complaints quickly. Before listing anything with a word mark or a recognisable character, search the trademark register for the class you are selling in. Common phrases are frequently registered for apparel specifically.
Platform disclosure rules
- Etsy allows print on demand, but if a partner manufactures the item you must declare that production partner on the listing. Sellers are suspended for hiding it, not for using one.
- Amazon KDP requires you to disclose AI-generated content when you publish.
- Adobe Stock requires a generative-AI label at submission.
Print on demand design ideas that sell
Categories that consistently work, with the reason attached rather than just the label:
- Typographic statements. One line of text, set well. Cheapest to produce, easiest to print, and legible at thumbnail size — which is where the buying decision happens.
- Occupation and identity. Nurses, engineers, teachers, developers. People buy things that say who they are.
- Regional and local pride. City, state and language references. Hard to compete with from outside India.
- Hobby and fandom niches. Cricket, bikers, gamers, gym. Specific enough that a generic design cannot serve them.
- Minimal line art. Prints reliably in every method, works on light and dark garments, and ages well.
- Occasion sets. Diwali, weddings, birthdays, farewells. Predictable demand you can prepare for.
There is an uncomfortable arithmetic behind all of these in 2026. If the tool is free and the prompt is obvious, thousands of people are generating close to the same picture. Design was the scarce input for a long time; it is not any more. What is scarce now is knowing something the model does not — a regional-language slogan, Devanagari typography, an inside joke from a community you actually belong to, a photograph you took. None of that is promptable.
One rule applies to every category: it has to read at 200 pixels wide, roughly the size of a search thumbnail. If the joke needs three lines of small text, nobody will ever get to the joke.
A checklist before you upload
- Is the file at least 300 DPI at the finished print size?
- Is the background genuinely transparent, with no halo at 400% zoom?
- Have you viewed it at 100% for artefacts and warped detail?
- Is the text yours, set in a real tool, and spelled correctly?
- Do your colours survive CMYK, and does the design work on both light and dark garments?
- Does it read at thumbnail size?
- Does it avoid any trademark, logo or recognisable likeness?
- Does your tool’s licence actually permit commercial use on your plan?
- Have you ordered one sample?
Point nine is the one people skip and the one that saves the most money. A screen never shows you how a print feels, how heavy a solid fill sits on fabric, or whether the black you chose came out charcoal.
Once your files are right, the remaining variable is the platform: print method, product range and what you keep per order. We compared them in best print on demand sites in India, and print on demand profit margins covers the arithmetic. For presenting the finished design, t-shirt mockup generators compares the tools, and t-shirt design ideas has more starting points.
If you want to test a few designs without paying anything upfront, create your store free and list three. The sample you order will teach you more than another tutorial will.
Print on demand design FAQs
What resolution do print on demand designs need?
300 DPI at the finished print size. A 12 by 16 inch t-shirt front needs 3600 by 4800 pixels, a 10 by 12 inch tote needs 3000 by 3600, and an 8 by 3.5 inch mug wrap needs 2400 by 1050. Most AI generators output 1024 to 2048 pixels, so upscale before uploading.
What file format is best for print on demand designs?
A transparent PNG for anything printed on a garment, so the background does not print as a white box. Use a flattened JPG for marketplace listing images instead, because Etsy does not support transparency and renders it as solid black. Vector files are better still for screen printing.
Why does my design look duller when printed?
Because screens are RGB and presses are CMYK. The brightest screen colours, particularly neon green, electric blue and hot pink, have no CMYK equivalent and shift when converted. Choose colours that sit inside the CMYK range rather than correcting afterwards.
Can I sell AI-generated print on demand designs?
Yes, if your tool\u2019s licence permits commercial use on your plan and the design does not infringe a trademark. Midjourney allows it on paid plans but not the free tier. In India, file copyright as the sole human author, since a September 2026 Copyright Office order held that an AI system cannot be named as an author.
What is the difference between DTG and screen printing for designs?
DTG prints inkjet directly onto the garment, so unlimited colours and gradients are fine and single units are economical. Screen printing uses one screen per colour, so each extra colour adds cost and designs work best in flat spot colours. Design for the method you will actually use.
What sells best in print on demand designs?
Typographic statements, occupation and identity designs, regional and local-language references, hobby niches and minimal line art. Specificity matters more than beauty: a design aimed at a narrow group competes with far less than a broad one, and it has to be legible at about 200 pixels wide.
Do I need to disclose that my design was made with AI?
On some platforms, yes. Amazon KDP requires disclosure at publishing and Adobe Stock requires a generative-AI label at submission. Etsy does not ban AI designs but requires you to declare any production partner that manufactures the item.
How do I design for mugs and tote bags?
Mugs are usually sublimation, which means the design goes onto light polyester-coated surfaces and white cannot be printed, so anything white becomes the colour of the blank. A standard mug wrap is 8 by 3.5 inches at 2400 by 1050 pixels. Tote bags take a 10 by 12 inch print area at 3000 by 3600 pixels.
